Blog

  • Unorthodox Chili: A Cozy Twist on a Classic Favorite

    Unorthodox Chili: A Cozy Twist on a Classic Favorite

    Every time I make chili, I think of my grandma’s tiny kitchen filled with the aroma of slow-cooked spices. But today, I want to share a version that’s a little off the beaten path—think smoky chipotle meets unexpected cocoa powder. It’s the kind of dish that transforms during simmering, turning into a comforting, mysterious brew.

    What excites me most is how this chili brings a riot of flavors with just a few unusual ingredients. It’s perfect for chilly evenings, or when you crave a meal that whispers secrets in every bite. Honestly, it’s become my go-to stew for making ordinary nights feel special.

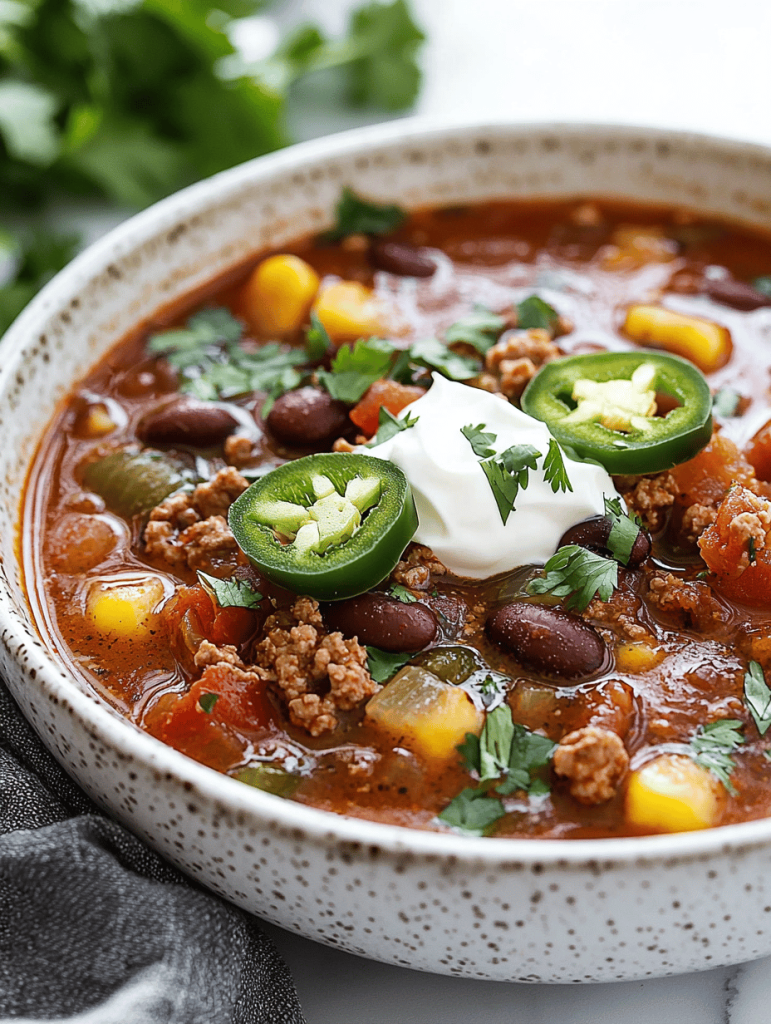
    Smoky Chipotle Cocoa Chili

    This chili is a hearty stew made by simmering ground meat with beans, tomatoes, and aromatics, flavored with smoky chipotle peppers and a hint of cocoa powder. The slow cooking process creates a thick, richly textured dish with complex layers of smoky, spicy, and slightly bitter notes, resulting in a comforting bowl with a deep, velvety appearance.
    Prep Time 15 minutes
    Cook Time 45 minutes
    Total Time 1 hour
    Servings: 4
    Course: Main Course
    Cuisine: Tex-Mex
    Calories: 350

    Ingredients
      

    • 1 lb ground beef or turkey or plant-based meat substitute
    • 1 can (15 oz) diced tomatoes with juice
    • 1 can (15 oz) black beans drained and rinsed
    • 1 medium onion finely chopped
    • 3 cloves garlic minced
    • 2 chili peppers chipotle peppers in adobo sauce finely chopped
    • 1 tsp cumin
    • 1 tsp cocoa powder unsweetened
    • 1 tbsp olive oil
    • to taste salt and pepper

    Equipment

    • Large pot or Dutch oven
    • Wooden spoon

    Method
     

    1. Heat the olive oil in a large pot over medium heat. Add the chopped onion and sauté until it becomes translucent and fragrant, about 5 minutes, stirring occasionally.
    2. Add the minced garlic and chopped chipotle peppers to the pot. Cook for another minute until the mixture smells fragrant and the peppers are slightly softened.
    3. Increase the heat to medium-high and add the ground meat, breaking it apart with a spoon. Cook until browned and no longer pink, about 8 minutes, letting it develop a slight crust for extra flavor.
    4. Sprinkle the cumin and cocoa powder over the meat mixture. Stir well to coat everything evenly, allowing the spices to toast for about 30 seconds, releasing their aroma.
    5. Pour in the diced tomatoes along with their juice, stirring to combine. Bring the mixture to a gentle simmer, then reduce the heat to low.
    6. Add the drained and rinsed black beans to the stew. Stir to distribute evenly, then cover the pot.
    7. Let the chili simmer gently for about 30 minutes, stirring occasionally. The flavors will meld, and the chili will thicken to a rich, velvety consistency.
    8. Taste the chili and season with salt and pepper as needed, adjusting the flavors to your preference.
    9. Serve the smoky chipotle cocoa chili hot, garnished with your favorite toppings like shredded cheese, chopped cilantro, or sour cream if desired.

    This chili isn’t just about flavor; it’s about turning simple ingredients into something memorable. It reminds me that even a classic dish can have room for a little daring twist. Sharing it with family or friends always sparks conversations and satisfied sighs.

    As seasons shift, I find myself craving hearty, layered flavors that warm from the inside out. This recipe hits right at that intersection of comfort and adventure, making every spoonful a small celebration. Sometimes, the best dishes are born from a little creative chaos—just like this chili.

  • Autumn’s Hidden Gem: Slow Cooker Pumpkin Chili with a Twist

    Autumn’s Hidden Gem: Slow Cooker Pumpkin Chili with a Twist

    As the leaves turn and a chill fills the air, I find myself craving something warming but a little different. This Slow Cooker Fall Chili with Pumpkin isn’t your everyday stew; it’s a cozy, unexpected twist on classic chili infused with the subtle sweetness and velvety texture of pumpkin. The slow cooker does all the work, allowing the flavors to meld into a rich, autumnal melody.

    Imagine opening your kitchen door to the comforting aroma of spiced peppers mingling with the earthy scent of pumpkin. Each bite offers a balance of smoky heat and gentle sweetness, making it perfect for brisk evenings or a casual weekend warm-up. It’s a dish that celebrates fall’s bounty and the art of simple, slow-cooked magic.

    Slow Cooker Fall Pumpkin Chili

    This fall-inspired chili is cooked slowly to allow the flavors of smoky peppers, beans, and pumpkin to meld into a comforting, hearty stew. The addition of pumpkin adds a velvety texture and subtle sweetness, resulting in a rich and vibrant dish with a thick consistency and inviting aroma.
    Prep Time 15 minutes
    Cook Time 4 minutes
    Total Time 4 minutes
    Servings: 6
    Course: Main Course
    Cuisine: American
    Calories: 320

    Ingredients
      

    • 1 lb ground beef or turkey optional protein
    • 1 medium onion diced
    • 3 cloves garlic minced
    • 1 can (15 oz) black beans drained and rinsed
    • 1 can (15 oz) diced tomatoes with their juice
    • 1 cup pumpkin puree unsweetened, smooth
    • 2 cups vegetable or chicken broth
    • 2 tsp chili powder
    • 1 tsp cumin
    • 1/2 tsp cinnamon optional but adds warm depth
    • to taste salt and pepper

    Equipment

    • Slow Cooker
    • Chef’s knife
    • Cutting board
    • Ladle

    Method
     

    1. Begin by dicing the onion and mincing the garlic.
    2. If using, brown the ground meat in a skillet over medium-high heat until fully cooked and browned, then drain excess fat.
    3. Add the diced onion and minced garlic to the slow cooker, along with the cooked meat if using. Stir to combine.
    4. Pour in the drained black beans, diced tomatoes with juice, and pumpkin puree. Add the broth, chili powder, cumin, cinnamon, and a pinch of salt and pepper.
    5. Stir everything together until well combined, ensuring the spices are evenly distributed.
    6. Cover the slow cooker with its lid and set to low for 4 hours, allowing the flavors to meld and the chili to thicken.
    7. Once cooking is complete, give the chili a good stir and taste, adjusting salt, pepper, or spices as needed.
    8. Serve hot, garnished with your favorite toppings like sour cream, shredded cheese, or chopped cilantro, if desired.
    This chili is more than just a seasonal recipe; it’s a testament to how a few unexpected ingredients can redefine comfort food. Whether you’re cozying up alone or sharing with loved ones, it promises a hearty, flavorful experience.

    As days grow shorter and we cherish the rituals of the season, this dish fits right in. Its earthy, spiced notes will linger in your kitchen long after it’s gone, inviting warm memories and future creations. The best part? It’s so easy, you’ll want to make it again and again.

  • Chilling with a Twist: The Unusual Charm of Rum Slushies

    Chilling with a Twist: The Unusual Charm of Rum Slushies

    Few desserts capture the spirit of summer quite like a Rum Slushie, but I you think youd just blend some rum with ice, think again. Today, I want to explore how infusing unexpected flavors can turn this chilly delight into a party in your mouth. From spicy cinnamon to exotic fruit hints, the possibilities are endless and totally addictive.

    Imagine a warm evening, the sun setting, and that initial sip cooling down your senses while surprising them with bursts of unexpected flavors. Rum Slushies are not just drinks; theyre an experience, a chaos of cold sweetness with a dash of daring. Perfect for those who crave show-stopping drinks that whisper stories of far-off places and wild adventures.

    Rum Slushie with Spicy Cinnamon and Fruit Flavors

    This Rum Slushie combines smooth, icy blended rum with infused flavors like cinnamon and exotic fruit extracts, resulting in a cold, slushy texture that is both refreshing and richly flavored. The mixture is blended to a consistency that’s thick, frosty, and visually appealing, perfect for summer evenings or party servings.
    Prep Time 10 minutes
    Total Time 10 minutes
    Servings: 4
    Course: Main Course
    Cuisine: fusion
    Calories: 150

    Ingredients
      

    • 2 cups ice cubes coarsely crushed for easy blending
    • 1.5 cups white rum preferably light for a smooth flavor
    • 1 cup fruit juice or fruit puree exotic options like mango or pineapple
    • 0.5 teaspoon cinnamon ground, for warming spice flavor
    • 1 tablespoon simple syrup or honey optional, for added sweetness

    Equipment

    • Blender
    • Measuring cups and spoons

    Method
     

    1. Add the ice cubes to the blender, ensuring they are evenly distributed at the bottom.
    2. Pour the white rum over the ice, followed by the fruit juice or puree.
    3. Sprinkle in the ground cinnamon to introduce a warm, spicy note.
    4. Add the sweetener of your choice for balancing tartness and enhancing flavor.
    5. Secure the lid tightly on the blender and blend on high speed until the mixture is smooth, thick, and slushy, about 30-40 seconds.
    6. Check the texture; if it’s too thick, add a splash more juice and blend briefly to incorporate.
    7. Pour the blended Rum Slushie into chilled glasses, ensuring an even, frosty appearance.
    8. Garnish with a slice of exotic fruit or a cinnamon stick for visual appeal.

    Notes

    For extra flavor, try adding a splash of lime juice or experimenting with different fruit purees.

    In a world of predictable cocktails, a rum slushie offers a playful, refreshing escape that still feels special. Its ideal for lazy weekends, spontaneous gatherings, or just a quiet night treating yourself. Keep experimenting with flavors, and let this icy concoction be your new summer secret.

    Whether its a backyard BBQ or a cozy night in, this recipe is your ticket to cold, flavorful freedom. The best part? Its easy enough to whip up on a whim, so you can always have a frosty treat ready. Cheers to keeping cool and spirited always on hand.

  • The Cozy Charm of Fall: Unique Chicken Casserole Twist

    The Cozy Charm of Fall: Unique Chicken Casserole Twist

    WHY I LOVE THIS RECIPE?

    • It’s a mix of sweet and savory that reminds me of family dinners by the fire.
    • The smell of the baking dish alone makes the whole house feel like autumn.
    • I love how the apple’s natural sweetness balances the richness of chicken and cheese.
    • It’s flexible enough to adapt with ingredients I have in the pantry.
    • The crispy topping is addictive, like a crunchy fall leaf under your fork.

    Apple Chicken Casserole

    This baked casserole combines tender chicken, sliced apples, and melted cheese topped with a crispy breadcrumb crust. It uses roasting and baking methods to develop caramelized flavors and a golden, crunchy top, resulting in a hearty dish with a balanced mix of savory and sweet elements. The final dish has a warm, bubbling interior with a crisp topping and visually appealing layered textures.
    Prep Time 15 minutes
    Cook Time 40 minutes
    Total Time 55 minutes
    Servings: 4
    Course: Main Course
    Cuisine: American
    Calories: 420

    Ingredients
      

    • 2 cups chopped cooked chicken shredded or cubed
    • 2 apples sliced thin, preferably tart varieties
    • 1 cup cheddar cheese shredded
    • 1/2 cup bread crumbs for crunchy topping
    • 3 tablespoons unsalted butter melted, divided
    • 1 teaspoon ground cinnamon
    • Salt and pepper to taste

    Equipment

    • Baking dish or casserole dish
    • Mixing bowls
    • Knife
    • Cutting board
    • Grater (for cheese and butter)

    Method
     

    1. Preheat your oven to 375°F (190°C). Grease your baking dish lightly to prevent sticking.
    2. Arrange the sliced apples evenly across the bottom of the dish. Sprinkle with ground cinnamon, salt, and pepper for flavor.
    3. Scatter the cooked chicken over the apples, creating an even layer that will serve as the hearty base of the casserole.
    4. Sprinkle the shredded cheese evenly across the chicken layer, ensuring good coverage for melty richness.
    5. Combine the bread crumbs with melted butter to create a buttery crumb topping, then sprinkle this mixture evenly over the entire casserole.
    6. Place the dish in the oven and bake uncovered for about 35-40 minutes, until the topping is golden brown and bubbling around the edges.
    7. Remove the casserole from the oven and let it rest for a few minutes; the topping will crisp further as it cools slightly, and flavors will meld beautifully.
    8. Slice and serve hot, enjoying the combination of tender chicken, sweet apples, and crunchy topping in each bite.
    This fall-inspired chicken casserole isn’t just about flavors; it’s about creating moments. The comforting scent filling the kitchen as it bakes makes everything feel a little more special. It’s a dish that gathers people around the table, sharing stories and snippets of the season.

    As the leaves drift down outside, this easy recipe proves that comforting food can also be creative. It captures the spirit of fall—warming, nostalgic, and just a little unexpected. Perfect for cozy family dinners or quiet nights in when you want a little taste of autumn’s magic.

  • Chill Out with a Citrusy Coffee Slushie

    Chill Out with a Citrusy Coffee Slushie

    Best of all, this slushie holds onto that satisfying coffee depth while lightening it with fresh, bright flavors. It’s the perfect way to enjoy your caffeine dose while feeling energized and refreshed. No matter the season, this icy concoction adds a playful twist to your beverage lineup.

    Iced Coffee Slushie

    This iced coffee slushie combines brewed coffee and sweeteners blended into a icy, slushy texture. It features a vibrant, frosty appearance with a satisfying balance of bold coffee flavor and bright, refreshing notes. The final drink is smooth, cool, and visually appealing, perfect for a hot day or as a chilled caffeine boost.
    Prep Time 10 minutes
    Total Time 10 minutes
    Servings: 2
    Course: Main Course
    Cuisine: beverage
    Calories: 60

    Ingredients
      

    • 1 cup freshly brewed coffee cooled to room temperature
    • 2 tbsp simple syrup or adjustable to taste
    • 1 cup ice cubes preferably small or crushed
    • 1/4 cup milk or milk alternative optional for creaminess

    Equipment

    • Coffee maker or brewing method
    • Blender
    • Measuring cups and spoons
    • Ice cube tray

    Method
     

    1. Pour the cooled brewed coffee into the blender, adding the simple syrup for sweetness.
    2. Add the ice cubes to the blender, creating a generous mound on top of the liquid.
    3. Secure the lid on the blender and blend on high until the mixture is smooth and frosty, with a slushy, ice-crystal texture.
    4. If desired, add milk or a milk alternative to the blender, then pulse a few times to incorporate evenly.
    5. Stop the blender and check the consistency—should be thick, creamy, and icy to the scoop.
    6. Pour the slushie into two chilled glasses, aiming for a frosty, slightly piled presentation.
    7. Garnish with a few coffee beans or a swirl of whipped cream if desired, and serve immediately for the best icy texture.
    So next time you want something cool and quick, reach for this vibrant brew. Its crisp, tangy profile offers a sweet palate wake-up that’s hard to beat. Keep a little zest in your freezer—you never know when a spontaneous slushie craving will strike.

  • Blood Moon Bash: Spooky Vampire Punch for Halloween

    Blood Moon Bash: Spooky Vampire Punch for Halloween

    As October’s chill bites deeper, I find myself craving something vibrant and eerily festive. This Vampire Punch, with its deep red hue and bubbling charm, feels just right for a Halloween gathering filled with mischief and magic. It’s more than a drink; it’s a ritual of delight, a swirling potion that sparks conversations and giggles.

    What sets this recipe apart isn’t just its striking appearance, but the story it carries—a nostalgic nod to childhood costume parties mixed with a dash of chaotic fun. Pouring it feels like conjuring a spell, the aroma of sweet fruit and tangy berries filling the air. It’s guaranteed to turn any spooky soirée into a bubbling, crimson celebration.

    Vampire Punch

    Vampire Punch is a vibrant, deep red beverage made with fruit juices, berry flavors, and sparkling soda, resulting in a bubbling, crimson-colored drink. The mixture is combined and chilled to create a visually striking and festive drink suitable for Halloween celebrations. Its final appearance is glossy, effervescent, and evocative of a bubbling potion.
    Prep Time 10 minutes
    Cook Time 5 minutes
    Total Time 15 minutes
    Servings: 8
    Course: Main Course
    Cuisine: Halloween
    Calories: 120

    Ingredients
      

    • 2 cups fruit punch store-bought or homemade
    • 1 cup blueberry juice or any berry-flavored juice
    • 1/2 cup lemon-lime soda for effervescence
    • 1 cup fresh berries for garnish and extra flavor

    Equipment

    • Large mixing bowl
    • Spoon or stirrer
    • Measuring cups and spoons
    • Serving pitcher

    Method
     

    1. Pour the fruit punch into a large mixing bowl, creating a deep red base.
    2. Add the blueberry juice to the bowl, then gently stir to combine the flavors and deepen the crimson hue.
    3. Chill the mixture in the refrigerator for about 10 minutes to allow the flavors to meld and the drink to become cool.
    4. Just before serving, pour the lemon-lime soda into the chilled punch to add bubbles and a sparkling finish, causing a lively fizz.
    5. Gently stir again to integrate the bubbles without losing too much of the effervescence.
    6. Pour the bubbling Vampire Punch into glasses or a decorative pitcher, then garnish each with fresh berries for added color and texture.
      2 cups fruit punch
    7. The final dressings should be vibrant, bubbling, and visually reminiscent of a spooky potion, ready to serve at your Halloween gathering.

    This Vampire Punch isn’t just a beverage; it’s an experience wrapped in a pitcher. Perfect for Halloween nights that call for a little chaos and a lot of cheer, it invites everyone to sip and share stories of past haunted adventures. As the evening winds down, the remnants of red juice and berry scent linger, promising more magical nights ahead.

    Seasons change, but the joy of crafting something spooky and spectacular stays. Sometimes, the simplest ingredients—red fruit juice and a splash of fun—make the most memorable moments. So, keep this recipe handy for your next festive gathering and enjoy every bubbling, spirited sip.

  • Spooky Elegance: The Halloween Spider Web Cake You Cant Resist

    Spooky Elegance: The Halloween Spider Web Cake You Cant Resist

    Every October, I find myself craving more than just candy; I want to create something that captures the eerie elegance of the season. This Halloween Spider Web Cake transforms a simple bake into a mysterious masterpiece that invites curiosity and awe. The intricate web design, achieved with just a simple twist of icing, feels like conjuring a spell in the kitchen.

    But beyond its spooky look, this cake is a celebration of texture and flavor—rich chocolate layers contrasted by a tangy cream filling. The web decoration not only looks stunning but also adds a delightful crunch, echoing the crunch of autumn leaves underfoot. It’s a perfect centerpiece for gatherings that want a touch of both chaos and beauty.

    Halloween Spider Web Chocolate Cake

    This chocolate cake features moist, layered chocolate sponge with a tangy cream filling. The exterior is decorated with a web pattern made from icing, creating a striking, web-like appearance that contrasts crunchy detailing with soft cake layers.
    Prep Time 30 minutes
    Cook Time 40 minutes
    Total Time 1 hour 10 minutes
    Servings: 8
    Course: Main Course
    Cuisine: Halloween
    Calories: 480

    Ingredients
      

    • 2 cups all-purpose flour sifted
    • 2 cups granulated sugar
    • ¾ cups unsweetened cocoa powder sifted
    • 2 teaspoons baking powder
    • 1 teaspoon baking soda
    • ½ teaspoon salt
    • 1 cup buttermilk at room temperature
    • ½ cup vegetable oil
    • 2 large eggs at room temperature
    • 2 teaspoons vanilla extract
    • 1 cup heavy cream
    • 8 oz cream cheese softened
    • 2 cups powdered sugar sifted
    • ½ cup unsalted butter softened
    • 2 cups confectionery icing for decorating
    • 1 cup dark chocolate melts melted, for decoration

    Equipment

    • Mixing bowls
    • Electric mixer
    • Cake pans
    • Cooling racks
    • Piping bag
    • Small decorative spatula

    Method
     

    1. Preheat your oven to 350°F (175°C) and grease two 9-inch round cake pans. In a large mixing bowl, whisk together the sifted flour, cocoa powder, baking powder, baking soda, salt, and sugar until combined.
    2. In a separate bowl, mix the buttermilk, vegetable oil, eggs, and vanilla extract until smooth. Pour the wet ingredients into the dry ingredients and gently fold everything together until the batter is uniform and slightly fluffy.
    3. Divide the batter evenly between the prepared cake pans and smooth the tops with a spatula. Bake for about 35-40 minutes, or until a toothpick inserted in the center comes out clean. Let the cakes cool in their pans for 10 minutes, then transfer to a wire rack to cool completely.
    4. While the cakes cool, prepare the cream filling. Beat the softened cream cheese and butter together in a bowl until creamy and fluffy. Gradually add the powdered sugar, then pour in the heavy cream and continue beating until the mixture is smooth and spreadable.
    5. Once the cakes are completely cooled, spread a layer of the cream filling on top of one cake layer. Place the second layer on top and apply a thin crumb coat all over the cake to seal in crumbs. Chill in the refrigerator for about 30 minutes.
    6. Finish frosting the cake with the remaining cream filling, smoothing the sides and top with a spatula. Transfer the icing to a piping bag fitted with a small round tip.
    7. Use the piping bag to pipe concentric circles of icing on the top of the cake. Starting from the center, draw a spiral outward, then use a small spatula or decorative tool to gently drag the icing from the center outward, creating a web pattern.
    8. Melt the dark chocolate and drizzle it in thin lines across the web, mimicking the spider web look. Optionally, add edible decorations like small sugar spiders or leaves for extra effect.
    9. Place the finished cake in the refrigerator for at least 15 minutes to set the decorations and allow the flavors to meld.
    10. Serve slices of the spooky web cake to reveal the moist chocolate layers and tangy cream filling inside. Enjoy the visual drama and delightful textures with each bite!

    Notes

    For an extra spooky effect, add small plastic spiders or glow-in-the-dark decorations on top before serving.

    This cake isn’t just a visual stunt; it’s a reminder of the joy in crafting something with your own hands. As the aroma of cocoa and vanilla fills the air, I remember why baking remains a comforting ritual amidst the spooky chaos of October.

    Every slice reveals layers of flavor and a web of memories tangled in sweet nostalgia. Making this cake is a small act of magic—celebrating the season with a treat that’s as mesmerizing as it is delicious.

  • The Colorful Charm of a Fresh Salsa Venture

    The Colorful Charm of a Fresh Salsa Venture

    Plus, it’s incredibly adaptable. Want more heat? Add a dash of jalapeño. Prefer a smoky undertone? Char the tomatoes slightly before chopping. Every batch becomes a canvas for your personal touch, making it uniquely yours each time.

    Roasted Tomato Salsa

    This roasted tomato salsa is made by charring tomatoes and peppers to develop a smoky depth, then blending with onions and herbs for a vibrant, chunky texture. The roasting process enhances sweetness and adds a complex smoky flavor, resulting in a flavorful, rustic condiment.
    Prep Time 10 minutes
    Cook Time 20 minutes
    Total Time 30 minutes
    Servings: 4
    Course: Main Course
    Cuisine: Mexican
    Calories: 50

    Ingredients
      

    • 4 medium tomatoes preferably cherry or heirloom for extra flavor
    • 1 yellow onion preferably a sweet or yellow onion
    • 2 cloves garlic minced
    • 1 jalapeño jalapeño pepper optional, for heat
    • 2 tablespoons olive oil for roasting
    • 1 bunch cilantro chopped, for freshness
    • to taste salt adjust after blending
    • to taste pepper optional, for seasoning

    Equipment

    • Baking sheet
    • Blender or food processor
    • Tongs
    • Knife
    • Cutting board

    Method
     

    1. Preheat your oven to 425°F (220°C). Place the tomatoes, sliced onion, and jalapeño on a baking sheet, drizzling with olive oil to help them caramelize and develop flavor. Roast for about 15-20 minutes until the tomatoes are roasted and slightly charred, the onion is softened, and the jalapeño is charred for extra smoky flavor.
    2. Remove the baking sheet from the oven and let the vegetables cool slightly. Use tongs to transfer the roasted tomatoes, onion, and jalapeño into a blender or food processor.
    3. Add the minced garlic, chopped cilantro, and a pinch of salt and pepper to the blender. Blend briefly until the ingredients are combined but still retain some texture, about 10-15 seconds.
    4. Taste the salsa and adjust the seasoning with more salt, pepper, or cilantro if desired. If you prefer a smoother salsa, blend a bit longer; for chunkier texture, pulse briefly.
    5. Transfer the salsa to a bowl and serve immediately for the freshest flavor, or refrigerate for up to a day to let the smoky notes deepen. Enjoy it with chips, tacos, or grilled dishes.

    Notes

    For extra smokiness, char the tomatoes directly over a gas flame or grill. Adjust the heat level with more or less jalapeño according to taste.
    So next time you crave something vibrant and uncomplicated, reach for these ingredients. The magic lies in their natural flavors, waiting to be unlocked with minimal fuss and maximum joy.

  • Tropical Bliss: The Unexpected Charm of Pineapple Slushie

    Tropical Bliss: The Unexpected Charm of Pineapple Slushie

    Imagine a sweltering summer day, your favorite playlist humming in the background, and that sharp aroma of fresh pineapple wafting through the air. Making a pineapple slushie isnt just about cooling down; its about capturing a slice of tropical paradise in a glass, even if youre miles from the coast. Its a surprisingly forgiving recipe that invites creativity—add a splash of coconut milk, a dash of mint, or even a pinch of chili for a twist.

    Every spoonful melts into a burst of sweet, tangy pineapple that awakens your senses. The icy texture crunches delightfully, reminiscent of that first icy bite on a summer buddy run. This isnt just a drink; its a little celebration, a quick escape into sunshine-laced days and carefree vibes.

    Pineapple Slushie

    A pineapple slushie is a frozen beverage made by blending sweet pineapple chunks with ice until smooth, resulting in a refreshing, icy drink that has a vibrant yellow color and a thick, slushy texture. It features a tart-sweet flavor profile with a fruity aroma, perfect for hot summer days.
    Prep Time 10 minutes
    Total Time 10 minutes
    Servings: 2
    Course: Main Course
    Cuisine: Tropical
    Calories: 120

    Ingredients
      

    • 2 cups frozen pineapple chunks preferably frozen for icy texture
    • 1 cup ice cubes to enhance chill and slushiness
    • 1/2 cup water or coconut water to help blend smoothly
    • 1 tablespoon honey or agave syrup optional for added sweetness

    Equipment

    • Blender
    • Measuring cups

    Method
     

    1. Measure out all the ingredients and add the frozen pineapple chunks into your blender.
    2. Add the ice cubes on top of the pineapple, then pour in the water or coconut water to help with blending.
    3. Pulse the blender a few times to start breaking down the ice, then blend on high until the mixture is smooth and slushy, about 30-45 seconds. You should see a thick, vibrant yellow mixture with a frosty texture.
    4. Taste the slushie and, if desired, add honey or agave syrup for extra sweetness. Blend again briefly to incorporate.
    5. Once the mixture is thick, creamy, and well combined, pour it into glasses. The texture should be fluffy and icy, with a bright yellow color and aroma of fresh pineapple.
    6. Serve immediately with a straw or spoon, enjoying the cool, refreshing burst of tropical flavor.

    Notes

    For an extra tropical twist, add a splash of coconut milk or a few fresh mint leaves before blending.

    As the season shifts and fresh pineapples become a fleeting treasure, this slushie offers a bright reminder of warm days and lazy afternoons. Its simple enough to whip up anytime, yet special enough to make you smile each time. Pair it with a good book or a lazy picnic, and let every sip remind you that sometimes, happiness is just a frozen treat away.

    In a world racing by, this creamy, zingy pineapple slushie is a little reminder to pause and enjoy the sweet moments. Whether for a quick refresh or a festive gathering, it fits effortlessly into a sunny days story. Cheers to more carefree, flavorful days ahead.

  • The Secret Ingredient to a Perfect Mango Slushie

    The Secret Ingredient to a Perfect Mango Slushie

    Ever wondered how to elevate your mango slushie from good to unforgettable? When I started experimenting with frozen mango chunks and a splash of lime, I found a surprisingly complex flavor profile hidden inside this simple treat. It’s not just about sweetness but a symphony of tang, richness, and a hint of tropical nostalgia.

    Using a secret spice—cardamom—to balance the natural sweetness transforms this icy beverage into a dessert you’ll crave all season. Plus, its vibrant color and intoxicating aroma make it impossible to resist on those blazing hot days. This isn’t your average summer drink; it’s a thirst-quenching adventure in every glass.

    Spiced Mango Slushie

    This mango slushie is made by blending frozen mango chunks with lime juice and a touch of cardamom until smooth and icy. The mixture results in a vibrant, thick, and-refreshing beverage with a bright color and a fragrant aroma, perfect for hot days. The final texture is velvety and slushy, ideal for serving chilled as a delightful summer treat.
    Prep Time 10 minutes
    Total Time 10 minutes
    Servings: 2
    Course: Main Course
    Cuisine: Tropical
    Calories: 120

    Ingredients
      

    • 3 cups frozen mango chunks preferably diced and frozen
    • 1 tablespoon lime juice freshly squeezed if possible
    • 1/4 teaspoon cardamom powder ground

    Equipment

    • Blender
    • Measuring cups and spoons

    Method
     

    1. Add frozen mango chunks to the blender.
    2. Pour in the lime juice and sprinkle the ground cardamom over the mango.
    3. Secure the lid on the blender and blend on high until the mixture is smooth, thick, and icy, about 30-45 seconds. The sound should be loud and consistent, and the mixture should look velvety with no chunks remaining.
    4. Pour the blended mango slushie into glasses, swirling slightly as you do to showcase its vibrant color.
    5. Optionally, garnish with a small lime wedge or a sprinkle of extra cardamom for visual appeal.
    6. Serve immediately with a straw, enjoying the icy, fragrant, and colorful beverage.
    This mango slushie sneaks in a little magic with every sip, making hot days feel like mini vacations. It’s perfect for spontaneous gatherings or solo moments of cooling delight, especially when the heat makes everything else seem less appealing.

    Every spoonful carries memories of mango markets and fragrant fruit stalls, reminding us that simple ingredients can stir up the most joyful escapes. Pouring this frosty treasure into your favorite glass might just become a new summer ritual you look forward to. Cheers to sweet escapes in a glass.